I found a few tutorials online to do this, but they’re old and don’t 100% work. So here’s some quick steps on how you might sign your git commits with GPG keys stored on your Yubikey.
Since I’m a mac user, these steps are specifically for macOS, for Windows check out Scott Hanselman’s great post here.
Step 1: Generate your GPG keys
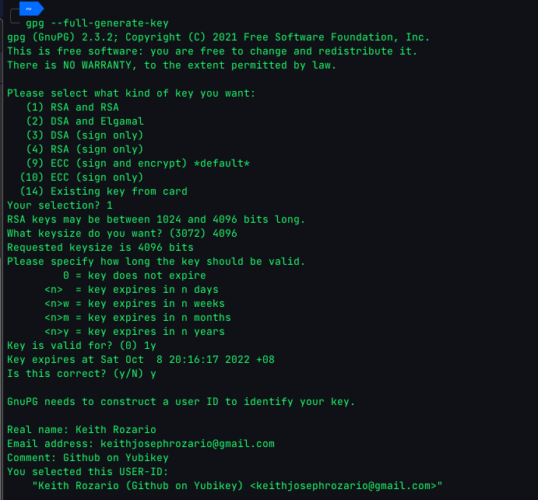
First install GPG and then generate the key using:
$ brew install gpg
$ gpg --full-generate-key
I used a 4096 RSA key (minimum key length supported by Github). You could choose to use something like ECC, but generally I find RSA to be compatible with just about anything, at the expense of a little speed (not security). ECC is cool, but let’s get the basics first and then we’ll try different types of keys. I also chose to expire the key after 1 year, you could choose any time (or not set an expiry) but some expiry is better than no expiry.
Once the key is generated, you can list it using:
$ gpg --list-secret-keys --keyid-format=long[Note: when executing this step, you won’t see the ‘Card Serial No. line’, in the screenshot below, we’ll cover that later]

For now, note down the id of the key, it’s the hex digits after the rsa4096/ on the first line. From here you can export the public key component for safe-keeping. We’ll upload this public key to Github later on so keeping it handy is super important.
$ gpg --armor --export 9600392115690F9 >> "pubkey.txt"Step 2: Configure git and test
OK, so now that we’ve generated our GPG key, and saved the public key into a file. Let’s first see if we can sign git commits with it.
For that we have to configure git to use our newly minted key, because I have code for personal and corporate use, and this is my personal Yubikey, I’ve set the git configurations locally to the specific directory I’m in. If you want to set it globally just replace --local with --global.
$ git config --local user.signingkey 96003921156930F9
$ git config --local user.email "[email protected]"
You can verify the configuration by running cat .git/config. Remember, if your email address here doesn’t match what’s in Github, Github will complain, or at best give you an ‘unverified’ tag.
Once complete we can sign our commits using the -S flag, like so:
$ git commit -S -am "commit with yubikey"Typically you’d have to enter the passphrase to finally commit.
Here’s is where I had my first stumble, I kept getting:
error: gpg failed to sign the data fatal:
failed to write commit object
It turns out my zsh wasn’t properly configured for gpg_tty, setting this fixed everything up. Thanks to this fix here. I managed to overcome this problem. If you have issues signing git commits, first try to sign a generic string with this command to see if it works:
export GPG_TTY=$(tty)
echo "test" | gpg --clearsign
Step 3: Transfer GPG key to Yubikey
If you managed to sign everything so far, you’re almost there.
Don’t try to push to origin yet, let’s first transfer the key from disk to the Yubikey.
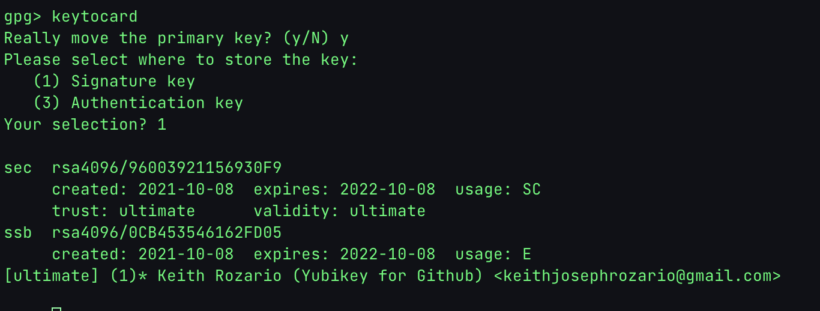
$ gpg --edit-key <key_id>
toggle
key 1
keytocard
1
save
You will be prompted for an Admin PIN — if you haven’t changed this before, it’ll be 12345678. The user pin is 123456.
Of course, to protect your key further, it’s important to set your Admin Key to something else, You can change this by:
$ gpg --card-edit
gpg/card> admin
Admin commands are allowed
gpg/card> passwd
Once the key is transfered, you’ll see a ‘Card Serial No. ‘ when you list the key.

Step 4: Copy public key to Github
OK, so now the key is in our Yubikey. Last step is to set this up on Github. Follow these steps here, if you’ve followed everything along so far, the “key” field should be populated with the full contents of the pubkey.txt file in your current directory.
And that should work. Now you can sign your commits, and push to Github, and get a glorious Verified tag for your commits.

Other notes
In order to use this key on another computer, you’ll need to load the public key there first. Fortunately, GitHub conveniently stores our public key at https://github.com/<username>.gpg for us. To make things easier run the following commands:
$ gpg --card-edit
gpg/card> admin
Admin commands are allowed
gpg/card> url
URL to retrieve public key: https://github.com/keithrozario.gpg
The commands above set a url in our Yubikey so that other computers know where to download the public key from.
Then on any new computer, simply plug in your Yubikey and:
gpg --card-edit
gpg/card> fetch
gpg/card> quit

gpg --edit-key <your_key_id>
gpg> trust
Your decision? 5
gpg> quit
For some reason, gpg couldn’t access github and download the key on my new macbook. So instead I downloaded the key from github, and hosted it on a local server using python -m http.server and then entered the localhost url to grab the key. This worked fine.
After you’ve imported the public key into the GPG configuration of your new computer, and also trust it, everything should work normally.
As to what the levels of trust mean — honestly, that’s something for me to check out later. But check out further references, here and here.