GitHub Webhooks
with Serverless
Just because you have webhook, doesn’t mean you need a webserver.
With serverless AWS Lambdas you’ve got a free (as in beer) and always on ability to receive webhooks callbacks without the need for pesky servers. In this post, I’ll setup a serverless solution to accept incoming POST from a GitHub webhook.
But first, let’s understand what a webhook is.
Think of a webhook as a reverse API. A regular ol’ forward API is something that exposes end-points for users to query (or post). This kind of API is completely passive, every action is triggered from the user-end. But sometimes you need the server-end to trigger events and push them back to you — especially if only the server-end is aware of when those events occur in real-time.
For example, I have a code repository on GitHub and want to trigger an action every time the repository is updated. In the past, I’d schedule periodic queries of the API to check for changes. And when I discover a change, I’ll trigger a job to do some processing. This technique is called polling, and while still widely used — is sub-optimal.
For starters, we’d have to decide how often we’d like to poll. Poll too frequently, and we’d be wasting resources checking for changes that rarely occur, Poll too infrequently, and we could be out of sync for a long duration. Like I said, polling is sub-optimal.

There must be a better way.
It’s called webhooks. A webhook is when an API goes active, and will actually push data your way. In the GitHub example, instead of me polling the GitHub API every hour, I could setup a webhook, so that GitHub will POST data to me at the moment the repository is updated. Thus no resources are wasted and no superflous API calls are made, the only time an API call is excuted is when there actually is a change.
But no such thing as free lunches, webhooks have a down-side.
When you query an API, all you have is code on an internet connected machine calling the API, But to receive webhooks you now need something to listen for it — for 24 hours a day, 7 days a week. In the past, this would be a full-blown webserver, continuously listening for a webhook call-back, this is OK if you already have a web-server. But if you don’t have one, spinning up a webserver, even if it’s nicely package in a docker container, is an expensive solution for this small problem.
There must be a better way.
And again, there is!

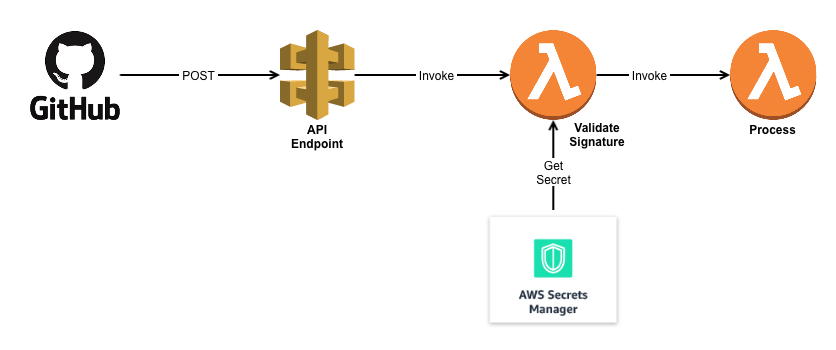
The solution is an API endpoint using AWS API gateway + Lambda. All a GitHub webhook needs is a place to make a POST message, and that’s exactly the definition of an API. I already had an API running (all serverless-ly), so I just added an additional endpoint called /github that would receive the POST message and invoke a lambda function for processing. GitHub even lets you decide what events trigger webhook call-backs — in my case only push events to the repo would callback the API. New comments on threads, new issues, or even wiki entries wouldn’t call-back, and thus wouldn’t waste resources.
A simple, and free way to receive GitHub webhooks, as AWS grants you 1 million GB-seconds of lambda executions per month.
Problem solved or rather Solved-ish!
Because now we have a security concern.
The API needs to be exposed to the internet — How do we ensure a malicious actor isn’t calling this function willy-nilly?
There must be a way. And there is! It’s a shared secret between GitHub and your Lambda

When you setup a Webhook on your GitHub repo, you can specify a secret. GitHub doesn’t encrypt the messages in transit (but it will perform TLS on endpoints that support it) — but if you specify a secret for the webhook, they’ll go a step further and provide a signature value in a header for you to validate.
From the documentation, GitHub uses HMAC with SHA-1.
HMAC is a keyed-hash fuction, which is a hash that takes in both the digest and a key, to generate the signature. It provides for both authentication (this message really came from GitHub) and integrity (the message has not be corrupted or tampered with) — since a single bit change in either the key or the data would result in a different signature.
Note: I’m not 100% certain my terminology is right, but I use signature instead of just ‘hash’, as this is a keyed function. Some refer to it as hash-value, but it is stored in a header called X-Hub-Signature
Once you load a secret onto the GitHub webhook, it’s easy for you to verify the authenticity of a message, by comparing the signature provided in the POST against the signature that you calculate on the receiving end. If they match, you can be sure the message has come from someone in possession of the shared secret — hopefully that’s only GitHub.
Note: GitHub go out of their way to recommend you use secure_compare or some equivalent function to prevent timing attacks. In my Python code I use the compare_digest function from the hmac libary, which isn’t much harder that coding a ==, but is built specifically to prevent timing attacks
Using a secret on the GitHub webhook solves for both the Authentication and Integrity problem.
Problem Solved? Not quite, now we have a new question — Where to store the secret for our lambda.
If I hard-coded it into the code (code I publicly publish on GitHub) that wouldn’t be secure at all. I could have opted to store it in an S3 file, a file only the lambda could read, but that seemed very tricky, and hardly sustainable (versioning, and permissioning would be pretty nightmarish)
There must be a better way.
And the better way is using AWS Secrets Manager. You could use something like HashiCorp Vault, but there’s no way I could figure out how to run that serverless-ly (is that even a word?) so AWS Secrets Manager it is!

Secrets Manager (at least to me) is nothing more than a API for Key-Value store. But because it’s an AWS resource, with an ARN, you can manage access to it via IAM roles. But that’s not the magic — after all files in s3 buckets have individual ARNs as well, and they also do have versioning, so why pay $0.40 per month for secrets manager?
First of all, the Secrets Manager API is far easier to call then an S3 file. Second, the Secrets manager API is extremely easier to update and rotate. It’s not hard to imagine a script that would update both my GitHub WebHook secret, and my Secrets manager secret at the same time. Creating the same for an S3 file would not be hard — but it wouldn’t be easy to maintain. Truth be told though — I was just excited to try out a new AWS offering… sue me!
There’s 2 drawbacks to secrets manager — one is that it’s not free. $0.40 per secret regardless of whether that secret is used or not (pretty high pricing). Second, it’s region aware — i.e a secret is stored not in a global instance (like S3), but a region specific store. Which is a bit painful, specifically when you’re calling them from lambda’s, but not a deal-breaker — but you either have to replicate the store across regions, or hard-code the region into the api call.
So in conclusion.
Just because you have a webhook, doesn’t mean you need a web-server.
All you really need is a end-point capable of receiving HTTP messages, and that’s what API Gateway + Lambda is. PLus it’s free!
Building that is dead-simple, create an API end point capable of receiving POST messages, to trigger a lambda that does the processing on your end. But remember to secure that endpoint, obviously run it over TLS, but also make sure you do some form of authentication prior to execution. Generic Python lambda function that will process a GitHub Webhook, lookup a secret in AWS Secrets Manager, and then compare_digest the two is here.
Last minute Addition.
Even though my API was exposed via a CloudFront distribution, I decided to point the GitHub webhook to the ‘native’ API Gateway uri. In AWS, every API Gateway gets a unique uri, which is then encapsulated as a CloudFront behavior. However, if you poss the data via CloudFront, you’ll need to enable POST messages at the distribution — which is OK, but I couldn’t find a way to enable POST only, without enabling PATCH, PUT and DELETE as well.
Post-Script
My code that would validate a GitHub signature and invoke a lambda (you’ll need to modify for your own usage)
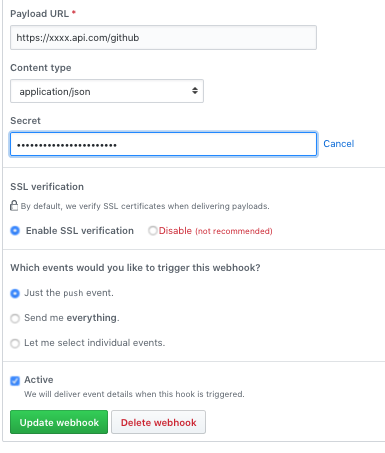
Setting Up GitHub looks like this: (make sure you use the right Payload URL and set the Content to JSON)
